5-Step Guide to Organize Wedding Photos Easily
A recent report revealed that we are going to see about 2.47 million weddings in the coming year-More weddings means more photos!
In this blog, we will tell you all about organizing wedding photos and share a 5-step easy guide along with some expert editing tips. Read on!
Organizing Wedding Photos: At a Glance
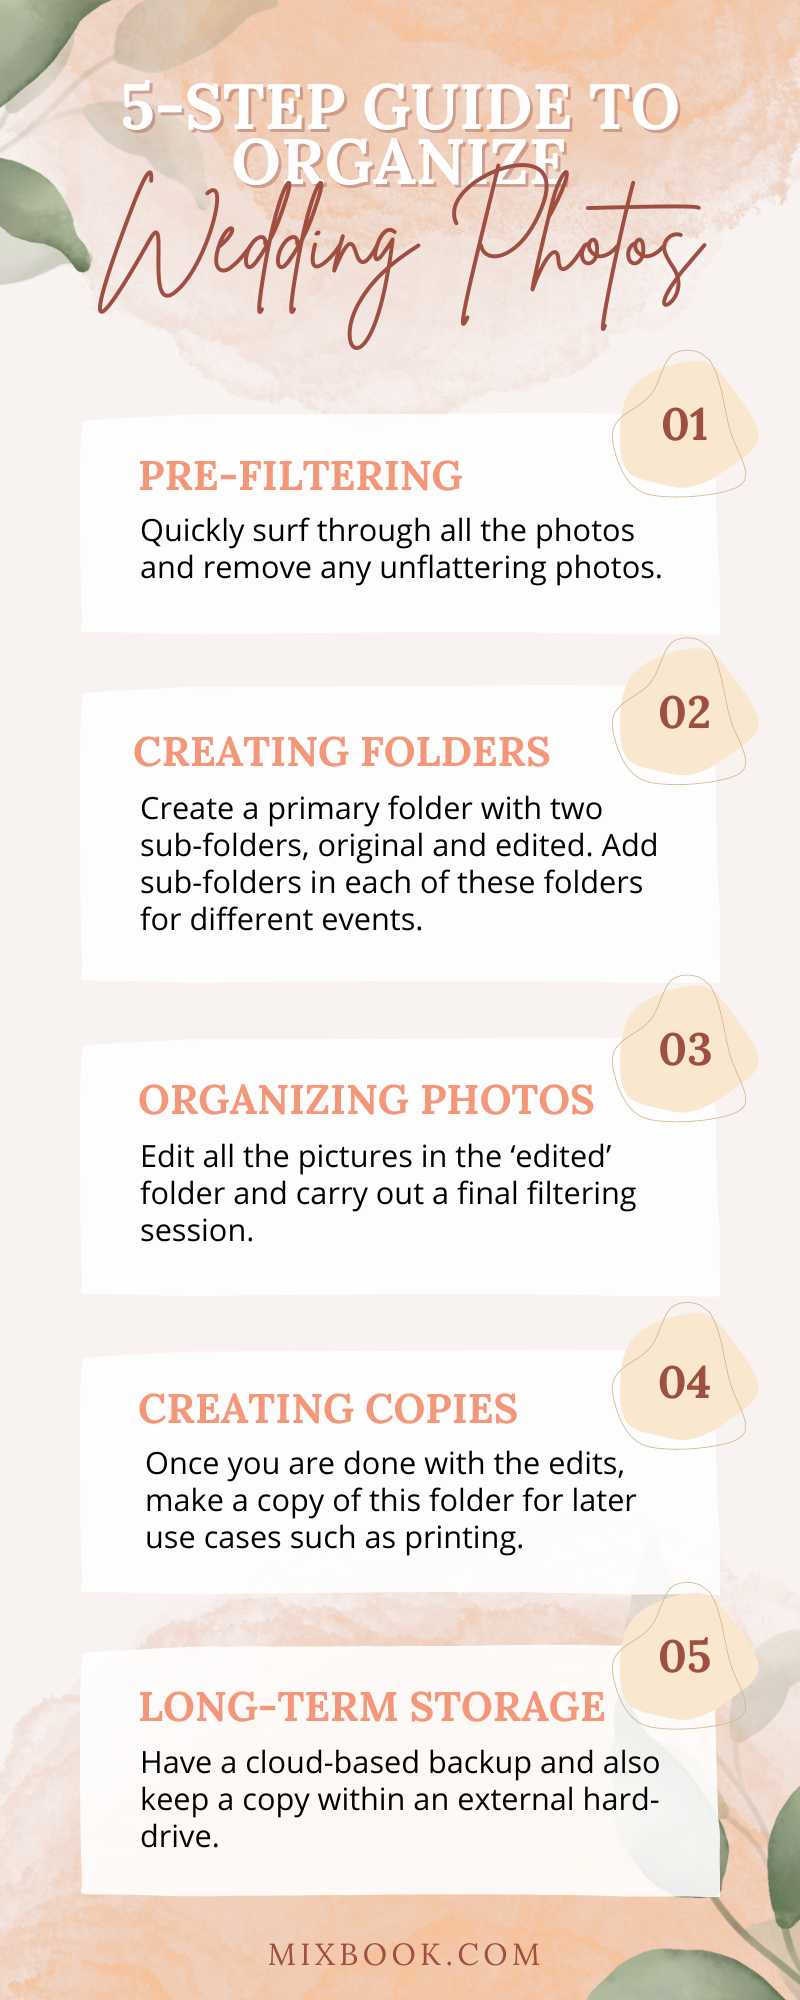
Pre-filtering
Quickly surf through all the photos and remove any unflattering/underexposed photos
Creating Folders
Create a primary folder with two sub-folders:
Original
Edited
Add sub-folders in each of these folders for different events such as bridal shoot, groom shoot, pre-ceremony, reception, etc.
Organizing photos
Start transferring all the photos into the designated folders. Repeat the same for both original & edited folders.
Edit all the pictures in the ‘edited’ folder and carry out a final filtering session. Remove any poorly framed shots or any picture that does not match the aesthetic
Creating Copies
Once you are done with the edits, make a copy of this folder for later use cases such as printing
Long-term storage
Avoid storing all your photos in just one spot. Have a cloud-based backup and also keep a copy within an external hard drive for emergencies
Pre-Filtering Wedding Photos
Probably the hardest yet most crucial part about organizing wedding photos is deciding which ones to keep and which ones to let go. Photographers typically return about 800 photos for an 8-hour wedding day coverage. That said, this amount is not standard and may even go up/down depending upon the situation.

When it comes to weddings, everyone has an aesthetic in mind: Vintage, bohemian, rustic, modern, etc. being a few examples. Choose images that fit the style. For example: If the theme you are going for is ‘garden’, you should pick images which have some sort of outdoorsy vibe/greens as opposed to picking indoor shots. Next up, delete all the blurry/out-of-focus shots. For this, you can zoom in and check if the image is still sharp or not.
Bonus: Check out the best wedding photo books here.
Creating Folders
Now that you have all the photos that you need to organize, it is time to create a destination folder for each one of them sorted by events. You can also sort the wedding photos alphabetically by creating a folder for each person/event, but this approach can be a tad bit confusing. Here is a step-by-step process for how to create folders:
Make a primary folder titled: Wedding__Couple name.
Within the main folder, create two subfolders titled ‘Edits’ and ‘Originals’ where you can bifurcate the pre-edit and post-edit shots.
Every wedding has a certain number of events, but the board categorization can be done as follows:
Detail Shots
These photos synchronize with the overall aesthetic of the wedding. Include things like accessories, gifts, jewelry, etc.
Pre-ceremony
Groom with groomsmen
Groom with parents, siblings, and immediate family
Bride with bridesmaids
Bride with parents, siblings, and immediate family
Bride/groom getting ready
Ceremony
Aisle shots
Flower girl/Ring bearer
Exchange of vows
The Kiss
Post-ceremony
Receiving line
Leaving ceremony
Formal photos
Reception
Cake cutting
Wedding party
Bride and groom dance
Bride throwing bouquet
Pro Tip: Mark all the photos that you think can be the highlight of your album. This will help you easily access them to make some quick edits later on. You can also download a preset and apply it to all the photographs. Here are the best Lightroom wedding presets.
Organizing Photos
Transfer all the images into the desired folder. Make sure to do this for both ‘edits’ and ‘originals’. The point of having two copies is that you will have an original as well as an edited set. If you do not like a certain edit or like the original look more, you can always restore it to the previous version.

When organizing photos, be sure to opt for maximum resolution. Transferring a downsized version might save you some space, but will also deteriorate the quality of your image. Always go for the maximum resolution when transferring photos.
Creating Copies
Now that you have organized all your photos, you can duplicate the folder if you want to share it with anyone. Another option is to upload them on a cloud server and add everyone from your contacts, but this could take some time due to the large upload size. You might also need to make copies if you want to get your photos printed or have them framed later.
Long-term Storage
Did you know? More than 1.12 trillion photos were taken in 2021 alone. Every year, there are thousands of cases where countless photos get lost due to hardware malfunction. Photos that are printed are not 100% safe either, prints begin to fade after some years.
Thus, saving your photos in a hard drive is a highly imperative step. Invest in a good quality solid state drive and transfer a copy of both your edited & original shots in it so that you can retrieve them easily later.
Summing Up
That was all on how to organize wedding photos. Easy wasn’t it? We agree that this isn’t something that could be done overnight, and even if it was, we would suggest you take your time and filter the best shots and don’t get stressed if this takes time. Read our blog on how to manage wedding stress for more help.
Pixel peep, edit, select and then organize, till you have the best selection of images that you can cherish for the decades to come.