While Mixbook has a great variety of backgrounds for our users to take advantage of, did you know you could also use your own photos as backgrounds for your page? It’s really quite simple and there are even two different ways to do it! Let’s start with the easier of the two methods.
Uploading Your Photo as a Background
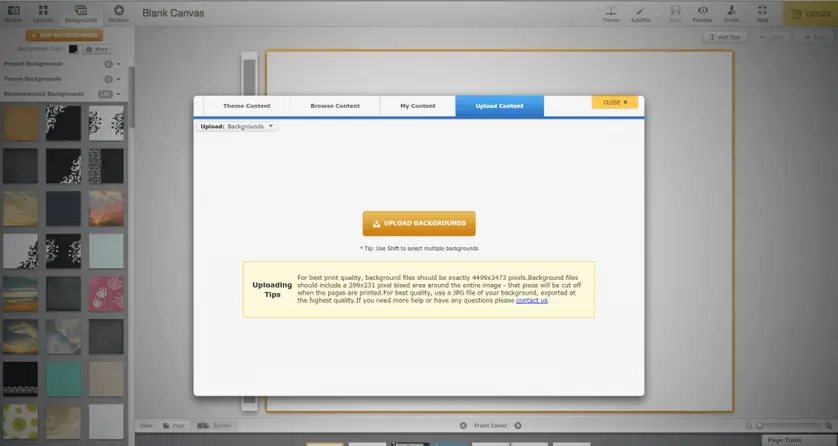
Open up your project in the editor and click on the Backgrounds tab. From here, click on the Add Backgrounds button then the Upload Content tab.
Clicking on the Upload Backgrounds button will bring up the following window:
Select the photo(s) you would like to use as your background and hit the Open button. Your upload will start immediately. Once the photo has finished, close out of the uploading box. You will now be able to view your new background under the “Project Backgrounds” section of your Background Tab.
Now that your photo is in the correct section, you can apply it to any page just as you would any other background. Select the page from the page tray, then click on the background. It will automatically apply to the active page!
This is a great method to use when your photo already has beautiful composition. Because we are uploading the photo as a background, it becomes fixed, and we are unable to control what part of our photo will show in the background. However, using this method automatically accounts for the bleed and trim area for your book.
For those of you who prefer more control over what part of your photo will show, we have our second method.
Stretching a Photo as a Background
First, upload the photo into your project through the Photos tab. Once your photo is uploaded into your project, drag the photo onto the page. The very first thing we need to do is remove the border from this photo. To do this, click on the paintbrush icon to bring up the Styles tool box. From here, click on the frame icon (third from the left) and click on the “No Border” option. This will remove the border from your photo, helping to ensure a great background print.
Next, using the red squares, stretch your photo to cover the entire page. Remember, we will need to manually account for the bleed area, so do make sure to stretch the photo well off the page.
Now that your photo is in place, you can zoom and pan the photo accordingly to get the perfect background composition.
*Note: If you plan on using this method and would like to place photos over your background, you will want to add this photo last. Stretch the photo over the page, then hit the “Send Back” button (the arrow pointing down) until the photo reaches the very back layer.
Hit the save button and your page is ready for print! Need help deciding on which photos to use as a background? Check out some photo background submissions from the staff here at Mixbook!
| Learn About Mixbook
Photo Books
| Create your own
Photo Book
**Insider Tip: To get the best looking full page spread, make sure your photo is at least 2MB at 300 dpi.
