21 Sep 2019 | 3 min read
How to Make Address Labels
Related keywords:LabelsCustom-LabelsHow-To-Make-Labels
From bills to baby announcements, address labels can come in handy for so many mailings. You can feature your own name, your family's name, or your name with your significant other's name prior to the wedding for use with the save the date photo cards and wedding invitations. Like personal checks, you can customize the look of your return address labels with a fun theme or even a photograph. You can also use address labels to send gifts such as photo books.
Making Your Own Return Address Labels
Mixbook's user-friendly design and editing software makes it easy to create stunning address labels in a matter of minutes. Simply follow these instructions to craft your own return address labels.
1. Log into your Mixbook account or create a username and password as a new customer.
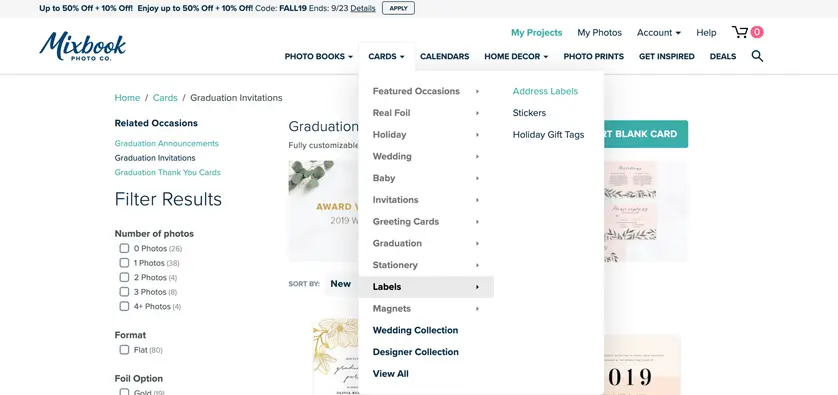
2. Hover over Cards and then Labels.
3. Click to choose Address Labels.
4. Choose Start Blank Label to design custom address labels from scratch or you can browse through hundreds of designs. You can also filter your choices by color to find something that suits your sense of style.
5. Click to preview any of the address label samples that you like.
6. Click the X to close and keep looking or click Personalize to choose that design.
7. A new window opens to allow you to add your photos. Choose how you will upload your photos:
a. From your device
b. From My Photos (previously uploaded photos)
c. Instagram
d. Facebook
e. Google Photos
f. SmugMug
8. If prompted, allow these accounts to use Mixbook to access your photos.
9. Click Upload Photos and choose which images you would like to add to your Mixbook project.
10. Click Add to Project when you are done selecting photos.
Personalizing Your Address Labels
11. Double-click the text box to update the name and address fields on the address labels.
12. Drag and drop photos into any placeholders as desired.
13. Click the image once and then move it into position using the cross arrows.
14. If desired, click Backgrounds to choose a custom background for the address label.
15. To add even more personalization, click the Stickers tab and then drag your desired graphic or text art design onto the address label canvas.
16. To resize the stickers, click once and then drag the corners of the red box until you reach the desired size.
17. Click Preview to review your address label design.
18. Click Edit to return and make changes or click Order to begin checkout.
19. Double-check the size and quantity of labels for your order.
20. Click Add to Cart to continue through checkout.
You will love having your own custom address labels for every piece of mail you send out of your home. These helpful little stickers are also useful as nametags for your personal items, inside the cover of books, or on your containers when you give someone homemade treats. Simply slap one of these address labels on items you're planning to loan out and your friends or family will easily remember the item is yours when it comes time to give it back.
Related Address Label Products
stickers, shipping label, holiday label, magnets, greeting photo cards
Related Address Labels Post
non-photo photo book ideas, printed envelopes, design tips
